Hejdaの見る夢

一人前のエンジニアを目指して頑張ったこととかをつらつら書くブログ

[2020/03/24 版] Private Azure Kubernetes Service cluster を構築する方法

内容を簡潔に。

  • 2020/03/09 に General Availability (GA) になった Private Azure Kubernetes Service (AKS) cluster を公式ドキュメントに沿って構築してみましたが出来ませんでした。
  • GitHub の Issue で解決方法が議論されていたので、それを参考に Private AKS cluster を構築することが出来ました。

ドキュメント

  • 公式ドキュメント

docs.microsoft.com

  • Bug 報告 Issue

github.com

重要なこと

このポストは公式ドキュメント及び Azure を責めるものではありません。

GA しているとはいえバグは付きものです。

皆でそれを積極的に報告し、GitHub 上で議論・解決策を模索している方々に助けられました。

とても感謝しているので記事に残しておこうと思いました。 (-人-)感謝

実際のコマンド

  • 必須条件
The Azure CLI version 2.2.0 or later
  • 変数の設定
export myclsname='my-private-aks-cluster'
export myrg='my-private-aks-cluster-resource-group'
export spname='my-private-aks-cluster-service-principal-name'
  • Resource Group の作成
az group create --location japaneast --name ${myrg}
  • Service Principal の作成
az ad sp create-for-rbac --name ${spname}
### ex

# az ad sp create-for-rbac --name ${spname}
Changing "my-private-aks-cluster-service-principal-name" to a valid URI of "http://my-private-aks-cluster-service-principal-name", which is the required format used for service principal names
Creating a role assignment under the scope of "/subscriptions/wwwwwwwwwwwwwwwwwwwwwwwwwwww"
  Retrying role assignment creation: 1/36
  Retrying role assignment creation: 2/36
{
  "appId": "xxxxxxxxxxxxxxxxxxxxxxxxx",
  "displayName": "my-private-aks-cluster-service-principal-name",
  "name": "http://my-private-aks-cluster-service-principal-name",
  "password": "yyyyyyyyyyyyy-yyyy-yyyy-yyyyyyyyyyyy",
  "tenant": "zzzzzzzzzzzzzzzzzzzzzzzzzzzzzzzzzzzz"
}

---> appIdpassword を使用します。

  • 変数の設定
export spid='xxxxxxxxxxxxxxxxxxxxxxxxx'
export sppass='yyyyyyyyyyyyy-yyyy-yyyy-yyyyyyyyyyyy'
  • Private AKS cluster を作成
az aks create \
    --name ${myclsname} \
    --resource-group ${myrg} \
    --load-balancer-sku standard \
    --enable-private-cluster \
    --service-principal ${spid} \
    --client-secret ${sppass}

Azure ポータルで確認

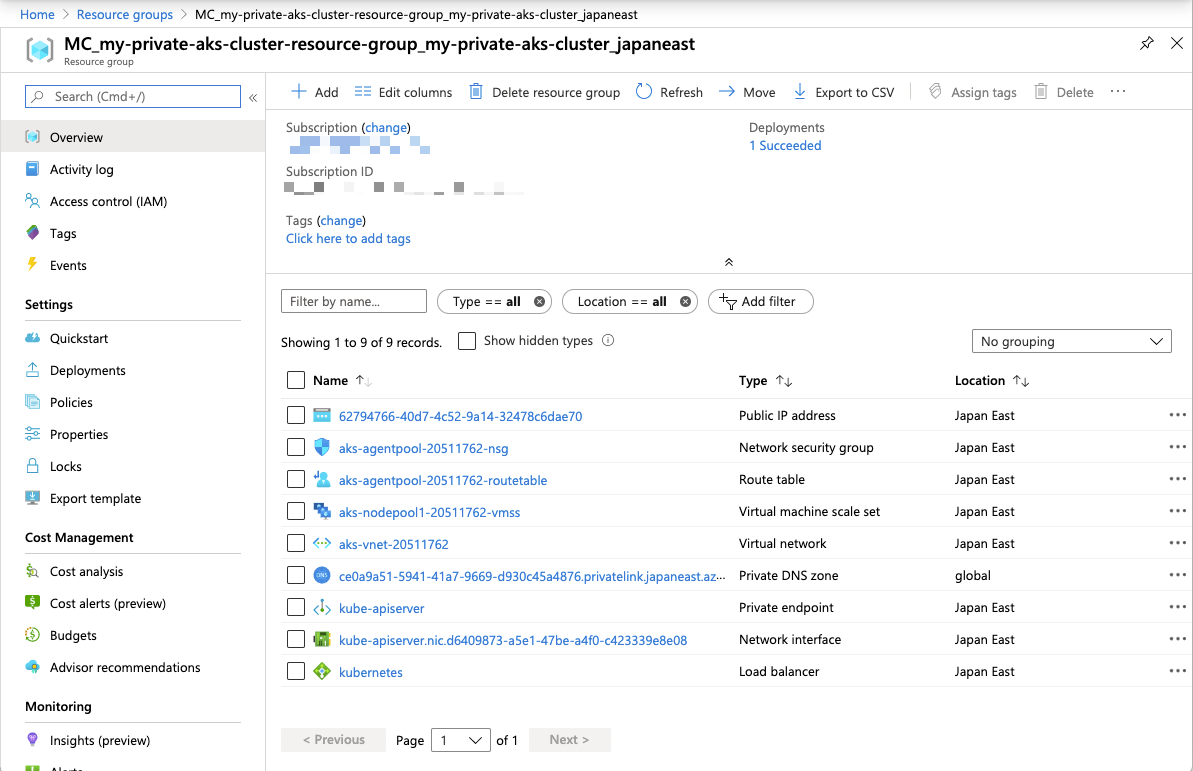
  • Private AKS cluster

f:id:nari_kyu:20200324061320p:plain

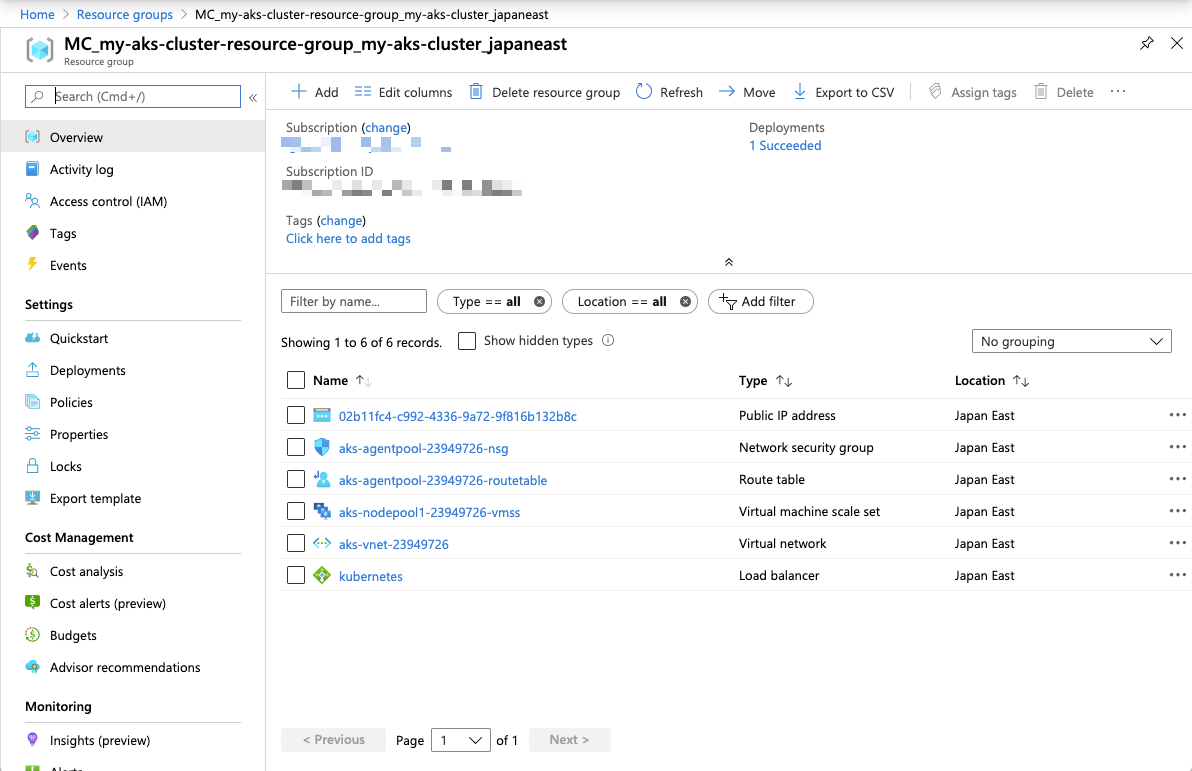
  • 通常の AKS cluster

f:id:nari_kyu:20200324061332p:plain

---> 詳しくは省きますが、Private AKS cluster を構築すると、通常の AKS cluster に比べ、上記のコンポーネントが増えるようです!!

まとめ

Bug 報告 Issue にて報告されてる方法、すなわち、

Service Principal を自分で作成して、az aks create 時に指定してあげることで、

無事に Private AKS cluster を構築することが出来るました。

この記事は Private AKS cluster を構築するところまでしかしていませんが、是非アプリを動かすところまでやってみて下さい。

Have fun !! :)

Azure Media Services を使って、ストリーミング動画に日本語・英語字幕を付けてみる📹 〜前編〜

何をする記事ですか?

Azure Media Services を使って日本語の動画に日本語・英語の字幕を付けていきます :)

Azure Media Services

azure.microsoft.com

記事が長くなったので、前編と後編に分かれています。

流れ

前回までにやったこと

前回 -> Video Indexer を使って、映像から音声を抽出してみた!! 📹

  1. 動画を用意する
  2. inver でテキストにする
  3. テキストをローカルに落とす(前回はここまで)

今回やること

  1. Azure Media Services に動画をアップロードする
  2. Azure 上で、動画をストリーミング用にエンコードする
  3. Azure の Static Website を利用して、動画を公開する

前回の作業のおさらい

  • Video Indexer を使うことで、映像から簡単に文字起こしが出来ました。
    • また、その文字起こしのデータもダウンロード行っておきます。

azure.microsoft.com

また、今回使用している動画は Serverless Meetup Tokyo #16 の主催者さまから頂いた動画データを用いています。

多謝 (-人-)

serverless.connpass.com

www.youtube.com

参考資料

くらでべ (クラウドデベロッパーちゃんねる)

www.youtube.com

Azure | Azure Media Services 基礎 (前編)

www.youtube.com

Azure | Azure Media Services基礎 (後編)

www.youtube.com

Azure Media Services に動画をアップロードする

上記の参考資料の公式動画を見ながら、Azure Media Services に手もとの動画をアップロードし、Azure 上でエンコードします。

  • Azure のポータルを開きます。

f:id:nari_kyu:20200314182018p:plain

  • 検索から Media Services を探します。

f:id:nari_kyu:20200314182030p:plain

  • 下記のような画面に遷移します。

f:id:nari_kyu:20200314182040p:plain

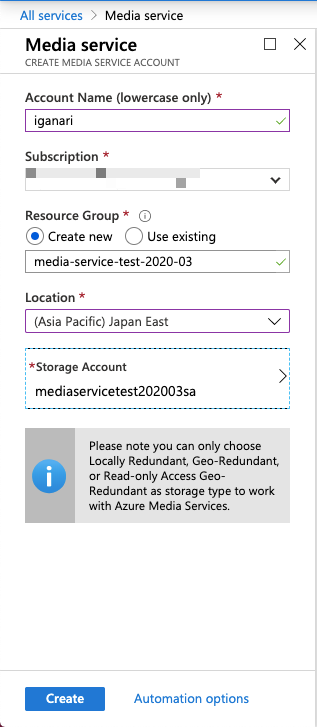
  • Add から新規作成し、以下のように埋めて作成します。

f:id:nari_kyu:20200314182933p:plain

  • 無事に作成出来ました :)
    • (適当に名前をつけた結果、これじゃない感が…みなさんは適切な名前をつけましょう

f:id:nari_kyu:20200314183204p:plain

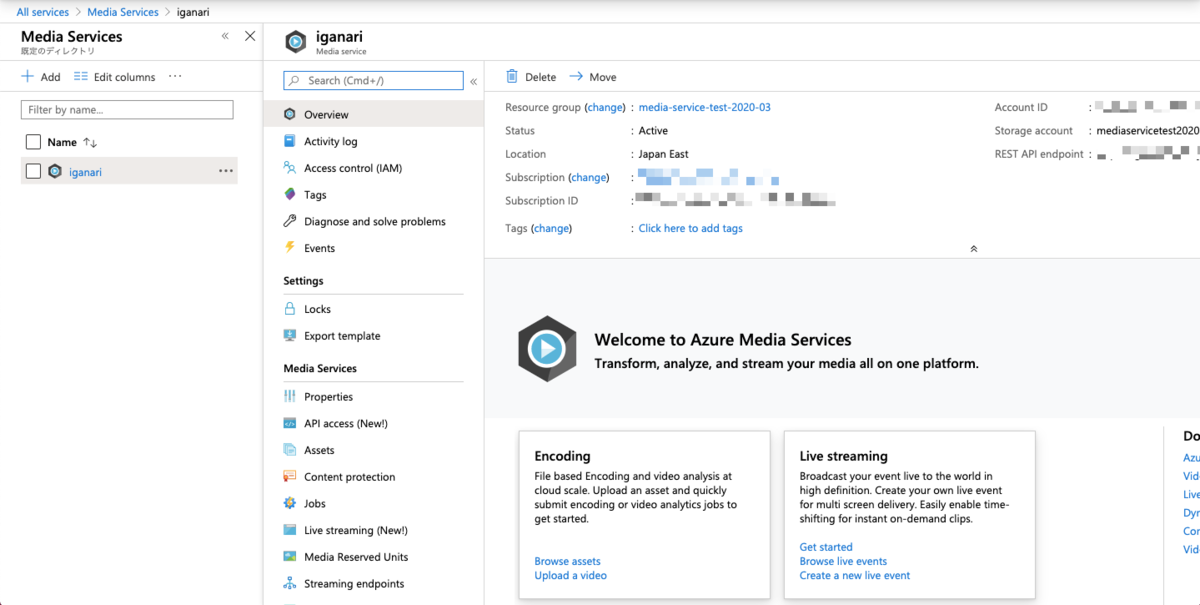
  • 早速、Media Services を開きます。

f:id:nari_kyu:20200314183748p:plain

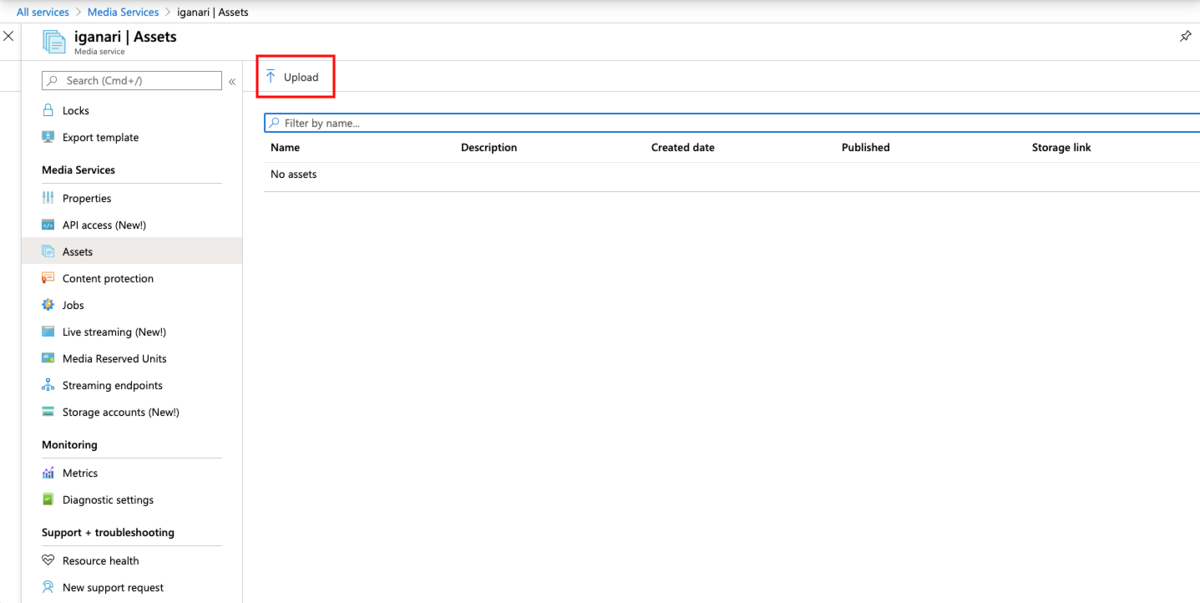
  • まずは動画をアップロードするために Assets を開き、 Upload をクリックします。

f:id:nari_kyu:20200314183835p:plain

f:id:nari_kyu:20200314183957p:plain

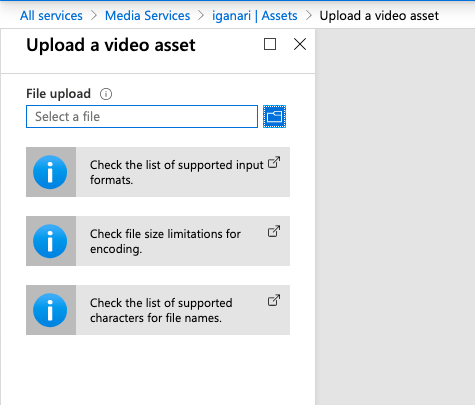
  • 下記のような画面になるので、ローカルに保存している動画をアップロードします。
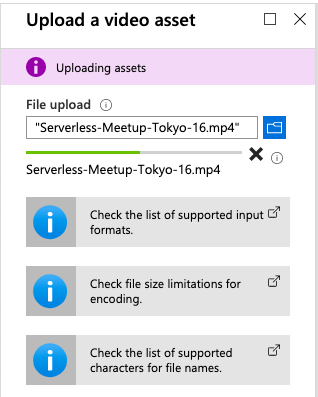
    • 今回は Serverless-Meetup-Tokyo-16.mp4 という名前の動画をアップロードしました。

f:id:nari_kyu:20200314184031p:plain

f:id:nari_kyu:20200314184126p:plain

  • Upload 中

f:id:nari_kyu:20200314184159p:plain

  • Upload が終ると Assets の中に登録されます。

f:id:nari_kyu:20200314184247p:plain

Azure 上で、動画をストリーミング用にエンコードする

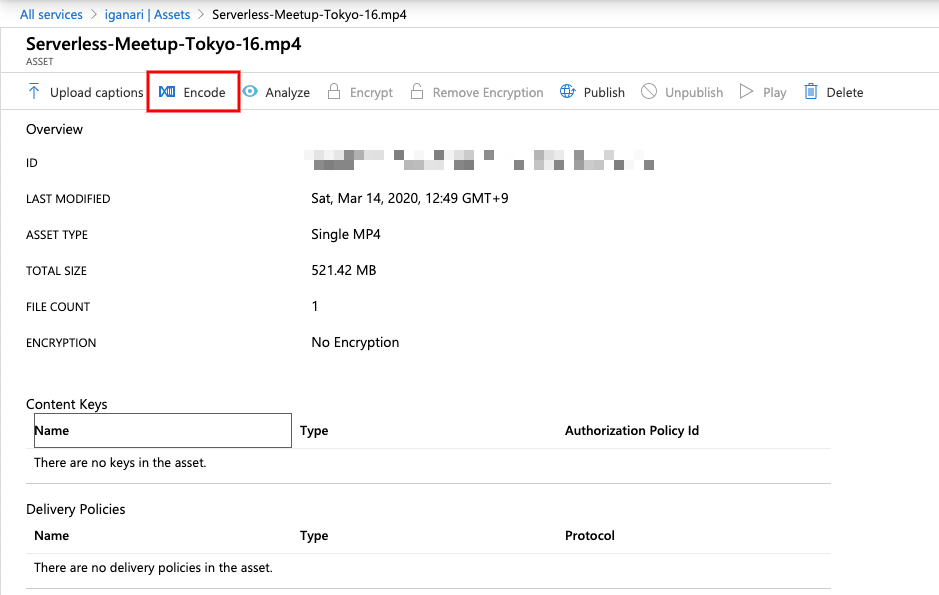
  • 引き続き、Assets の中で Encode をクリックします。

f:id:nari_kyu:20200314184939p:plain

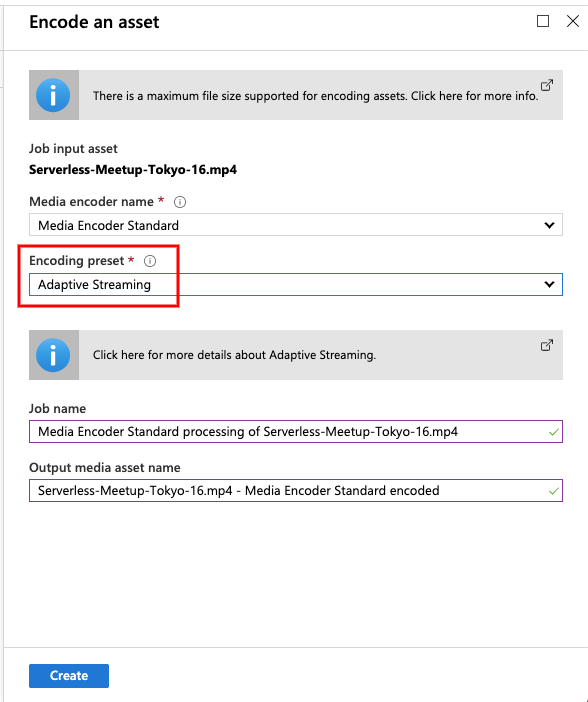
  • 下記のような画面に遷移します。
    • ここで、Encoding presetAdaptive Streaming に指定しましょう。

f:id:nari_kyu:20200314185040p:plain

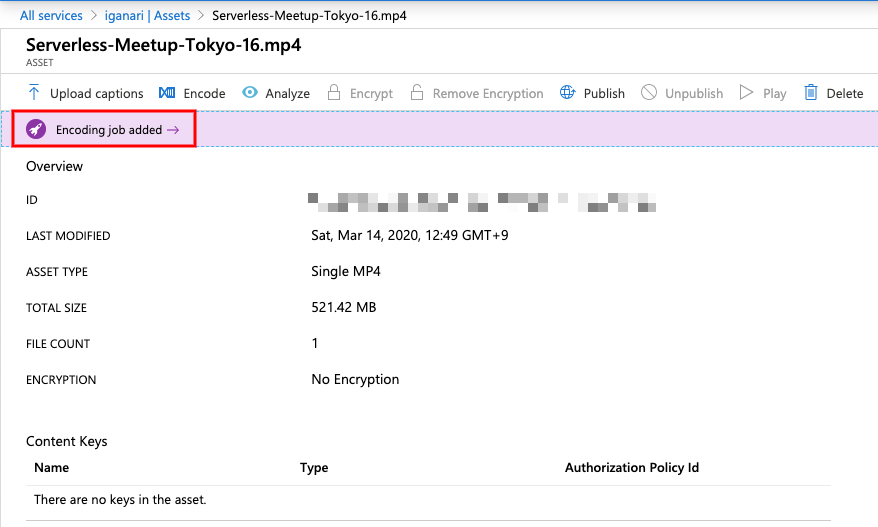
  • そうすると、Encode が始まります。

f:id:nari_kyu:20200314185110p:plain

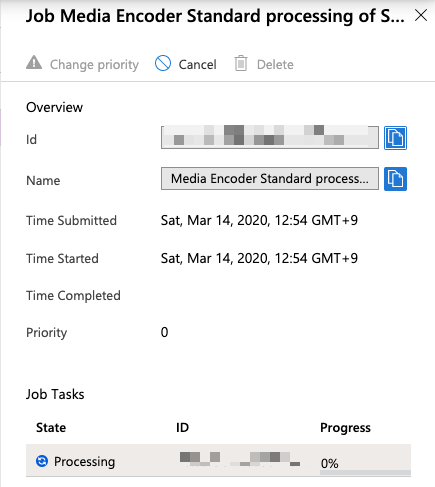
f:id:nari_kyu:20200314185121p:plain

  • しばらく待ちましょう :)

f:id:nari_kyu:20200314185154p:plain

  • Encode が終わった後に、Assets に戻ると、先程作成したストリーミング用の動画が出来上がっているのでこちらをクリックします。

f:id:nari_kyu:20200314185722p:plain

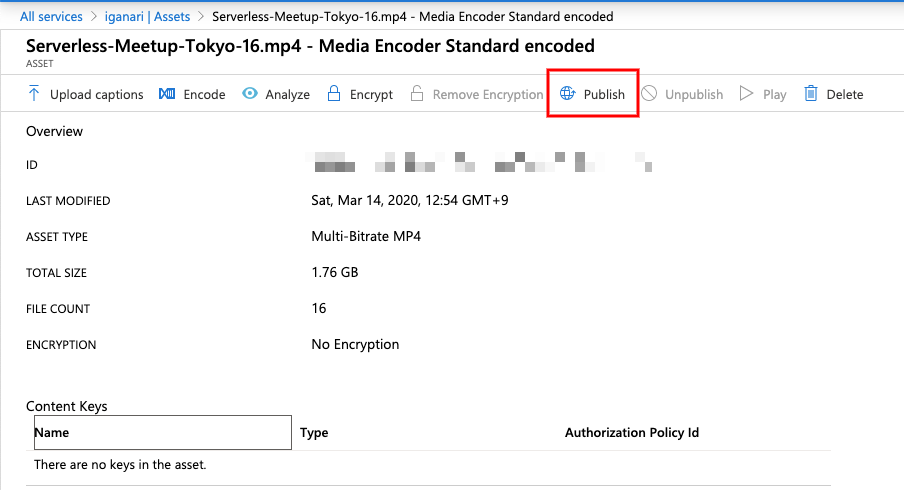
  • ストリーミング用の動画のページにて Publish をクリックします。

f:id:nari_kyu:20200314234505p:plain

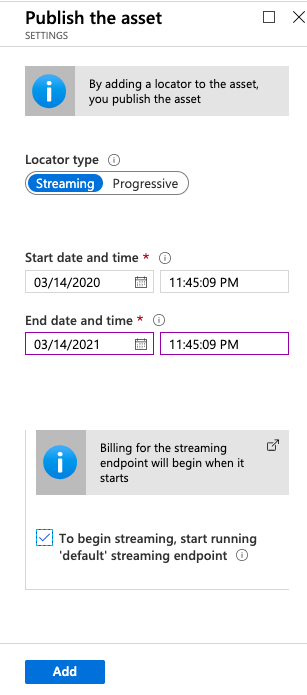
  • 下記の様な公開期間の設定が出来るので、任意に設定しましょう。
    • デフォルトは 100 年間になっています。

f:id:nari_kyu:20200315145027p:plain

  • Publish の設定を行うと、 Play がクリック出来るようになります。

f:id:nari_kyu:20200315145302p:plain

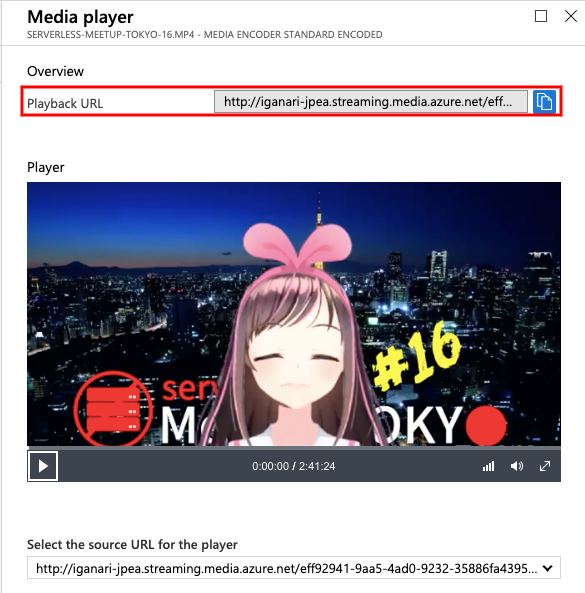
  • 動画の Player が立ち上がるので、 Playback URL をコピーしておきます。

f:id:nari_kyu:20200315145842p:plain

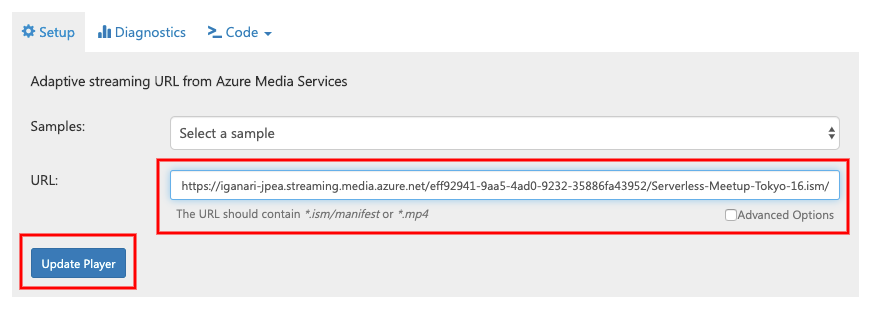
  • ブラウザの別タブにて、Azure Media Player を起動し、先程コピーした Playback URL を入力して、 Updatae Player にて反映させます。
    • この時、 Playback URLhttp なので、 https に変換しましょう。( s を入れるだけです)

ampdemo.azureedge.net

f:id:nari_kyu:20200315150112p:plain

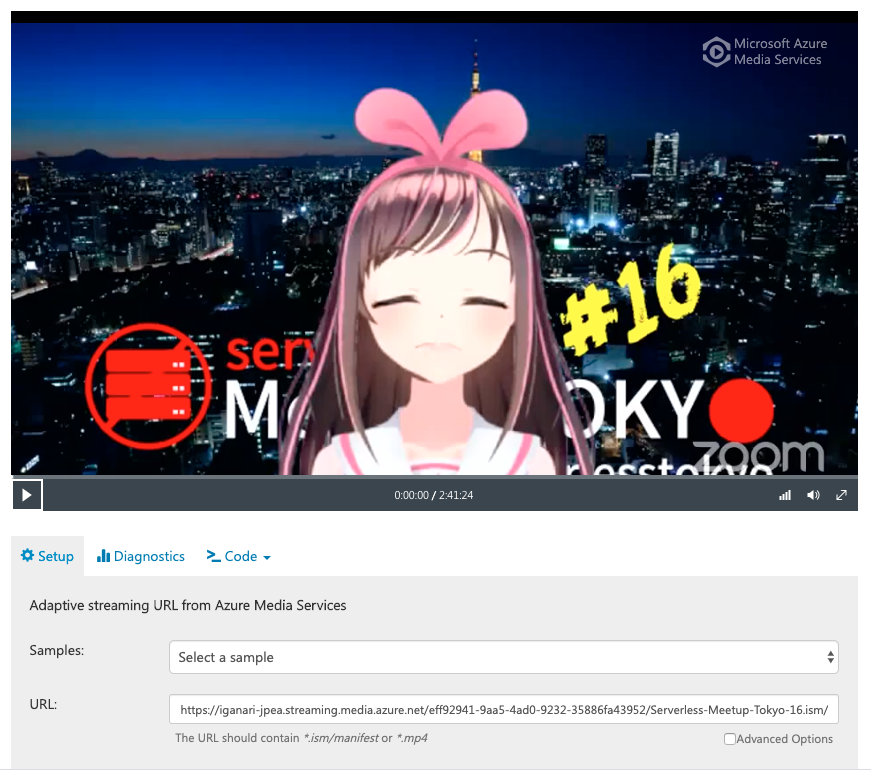
  • Azure Media Player でも再生出来ることが分かりました。

f:id:nari_kyu:20200315150353p:plain

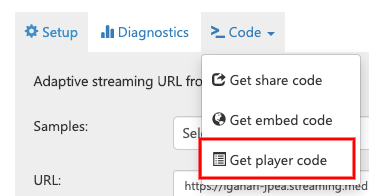
  • Azure Media Player の Code をクリックし、 Get Player code をクリックします。

f:id:nari_kyu:20200315151019p:plain

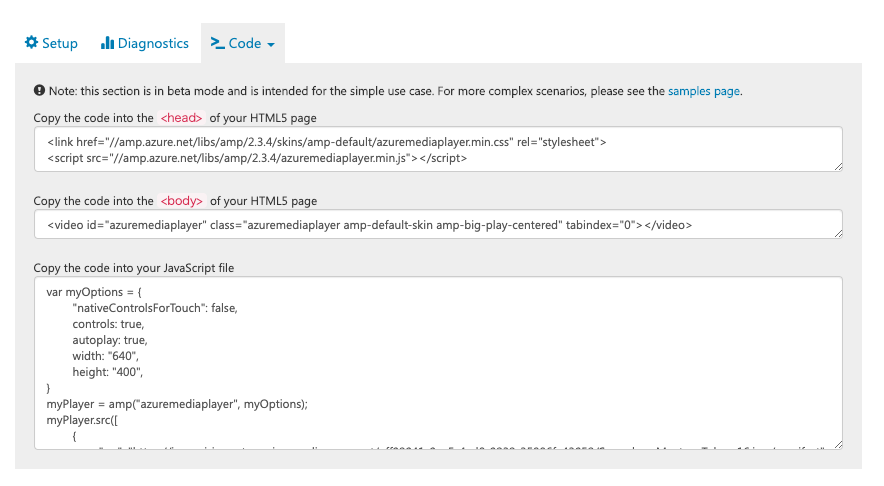
  • 下記のように、html ファイルに記載すべき情報を掲示してくれるので、ローカルに作成した index.html にそれぞれを記載していきます

f:id:nari_kyu:20200315151222p:plain

  • index.html

gist.github.com

  • 実際の例
<!DOCTYPE HTML>
<html>
<head>
  <meta http-equiv="Content-Type" content="text/html; charset=UTF-8">
  <title> Serverless Meetup #16  </title>

  <link href="//amp.azure.net/libs/amp/2.3.4/skins/amp-default/azuremediaplayer.min.css" rel="stylesheet">
  <script src="//amp.azure.net/libs/amp/2.3.4/azuremediaplayer.min.js"></script>

</head>
<body>
  <video id="azuremediaplayer" class="azuremediaplayer amp-default-skin amp-big-play-centered" tabindex="0"></video>

<script>
  var myOptions = {
    "nativeControlsForTouch": false,
    controls: true,
    autoplay: true,
    width: "640",
    height: "400",
  }
  myPlayer = amp("azuremediaplayer", myOptions);
  myPlayer.src([
          {
                  "src": "https://iganari-jpea.streaming.media.azure.net/eff92941-9aa5-4ad0-9232-35886fa43952/Serverless-Meetup-Tokyo-16.ism/manifest",
                  "type": "application/vnd.ms-sstr+xml"
          }
  ]);
</script>

</body>
</html>

Azure の Static Website を利用する

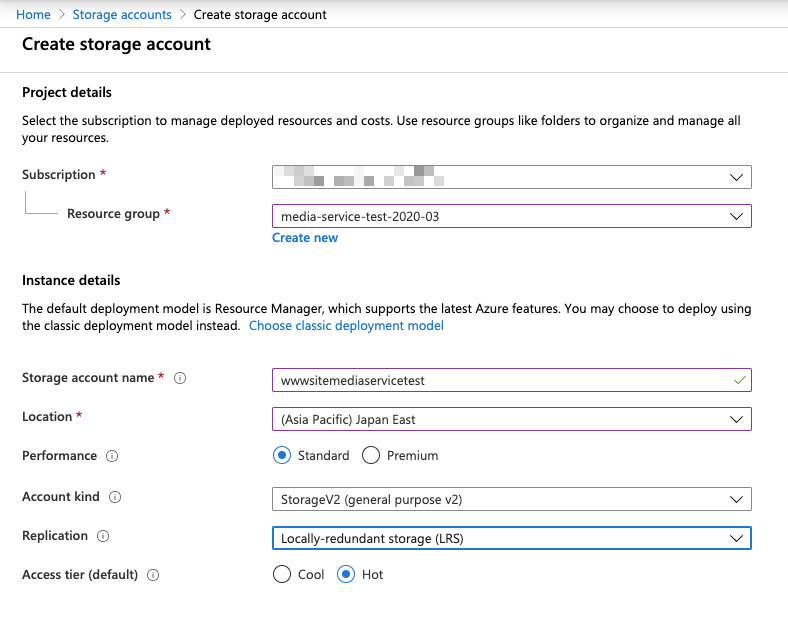
  • Azure のポータルに戻り、Static website 用の Storage account を新規で作成します。

f:id:nari_kyu:20200315154802p:plain

f:id:nari_kyu:20200315154812p:plain

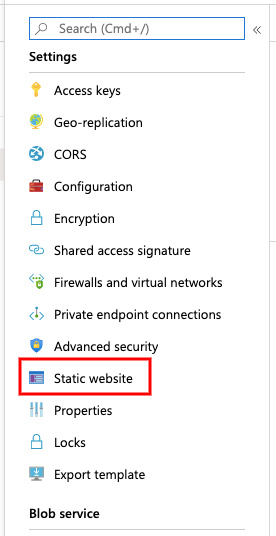
  • 新規作成した Storage account を開き、Settings の中の Static website を開きます。

f:id:nari_kyu:20200315155114p:plain

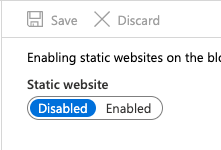
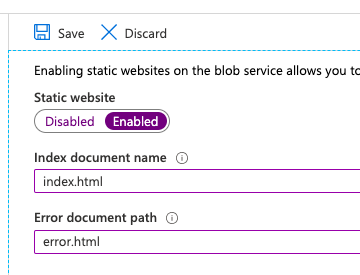
  • DisabledEnabled に変更し、設定項目を入れて Save します。
    • ここ表示される、 Primary endpoint をコピーしておきましょう。

f:id:nari_kyu:20200315155231p:plain

f:id:nari_kyu:20200315155240p:plain

f:id:nari_kyu:20200315155250p:plain

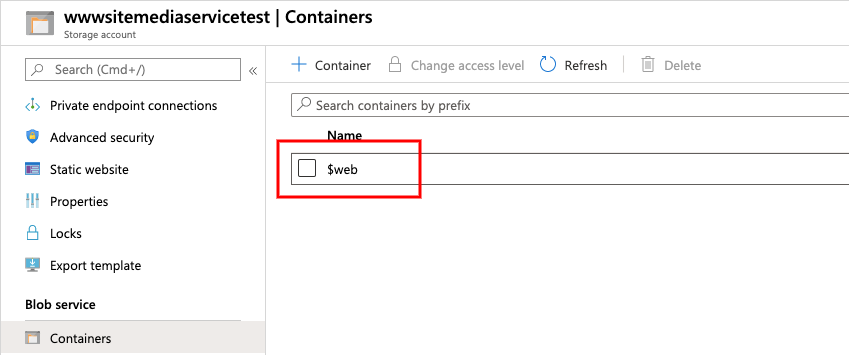
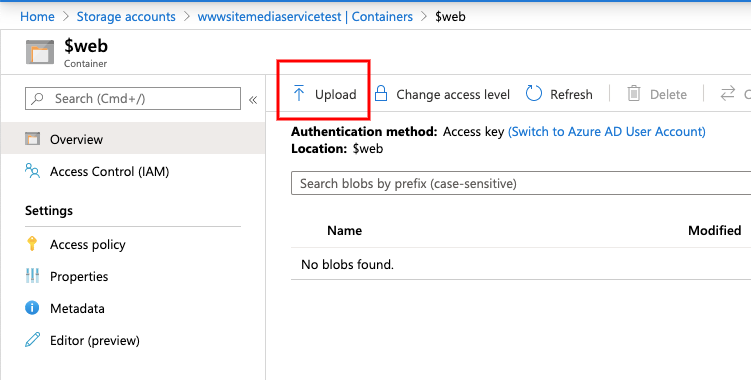
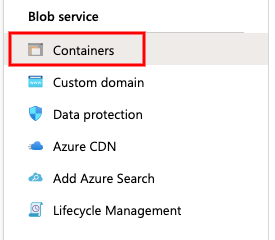
  • 次に、 Storage account の中の Blob service 項の Containers をクリックし、$web をクリックします。

f:id:nari_kyu:20200315155930p:plain

f:id:nari_kyu:20200315155951p:plain

  • 遷移先で、先程作成した index.html をアップロードします。

f:id:nari_kyu:20200315155940p:plain

f:id:nari_kyu:20200315160108p:plain

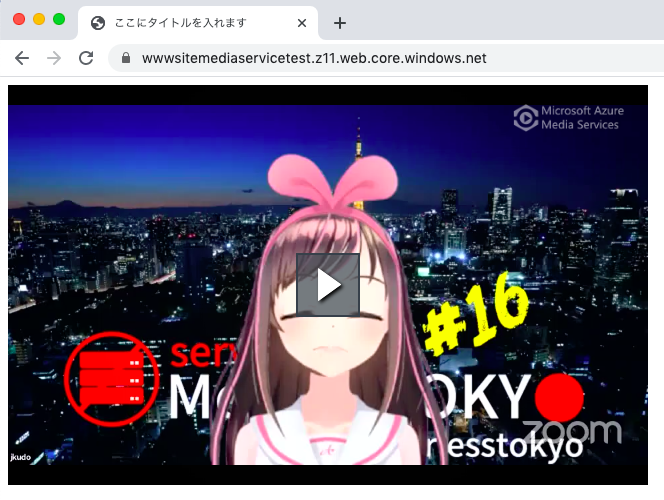
  • 先程コピーした Primary endpoint にアクセスして、動画が再生出来るか確認しましょう。

f:id:nari_kyu:20200315160639p:plain

まとめ

Azure Media Services と、 Azure Static website を用いることで簡単に動画を公開することが出来ました!!

次回は日本語と英語の字幕を付けていきます!!

Have fan! :)

Video Indexer を使って、映像から音声を抽出してみた!! 📹

動機

昨今、さまざまな要因でオンライン勉強会が施行されるようになりました。

その中で、さまざまな分野で試行錯誤が練られていると思います。

多拠点での開催や、VRなどを使った方針、如何にストレス無く配信・視聴出来る仕組みづくり等々。

また、その技術やナレッジに関しても日々アップデートされています。

先週行われた、Serverless meetup #16 でも、初のオンライン開催され、とても好評でした。

この勉強会では Zoom と YouTube Live を用いた、多拠点での配信を行ってました。

わたしはたまたま、配信場所にお邪魔する機会があったので参加してきたのですが、とても貴重な経験をさせて頂きました。

多謝(-人-)

後日、動画を翻訳することで国内だけでなく全世界を視野にいれた配信が出来るのでは? という話になり、私が個人的に前から気になっていた Azure Media Services を使ってみいなと思っていました。

  • Azure Media Services

https://azure.microsoft.com/en-us/services/media-services/

その中で、まずは Video Indexer を用いて、映像から音声を文字おこしする作業をしてみます。

  • Video Indexer

https://azure.microsoft.com/en-us/services/media-services/video-indexer/

勉強に使った YouTube

くらでべ (クラウドデベロッパーちゃんねる)

www.youtube.com

Azure | Azure Media Services 基礎 (前編)

www.youtube.com

Azure | Azure Media Services基礎 (後編)

www.youtube.com

Tweet

動画を見ていて、特に気付きがあった点をつぶやいてました。

  • 前編を視聴している際のつぶやき

  • 後編を視聴している時のつぶやき

Video Indexer を試してみる

くらでべで学んだ結果、まずは Video Indexer を用いて動画の中の言語抽出をする必要があるようなので、試してみます。

https://azure.microsoft.com/en-us/services/media-services/video-indexer/

利用するステップは 3 ステップです。

  • Video Indexer にログイン
  • データのアップロード
  • 結果の確認

Video Indexer にログイン

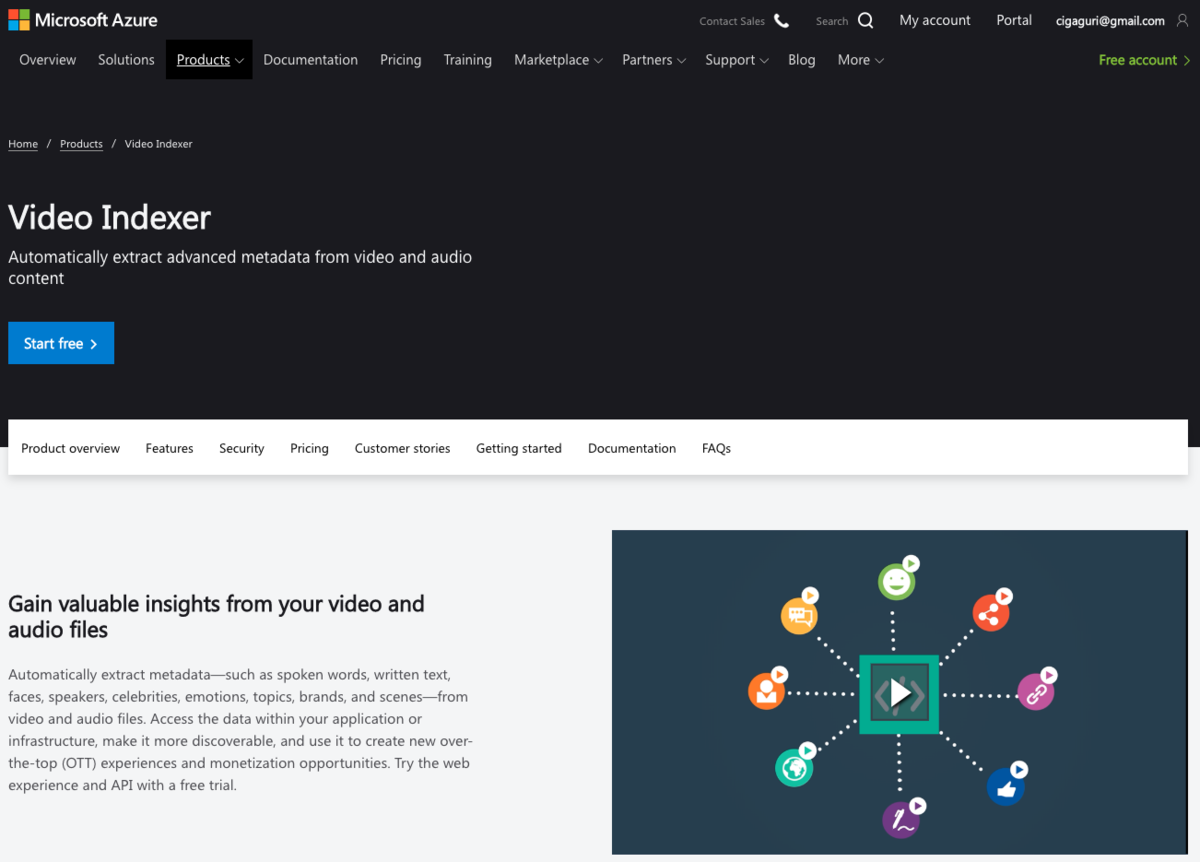
https://azure.microsoft.com/en-us/services/media-services/ にアクセス

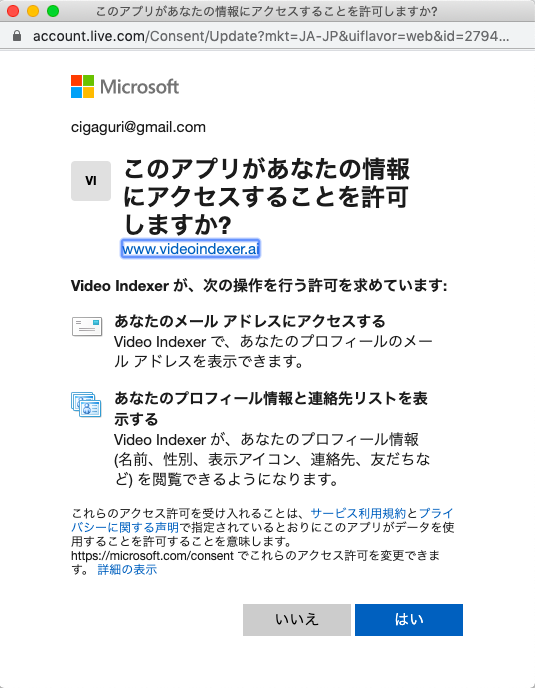
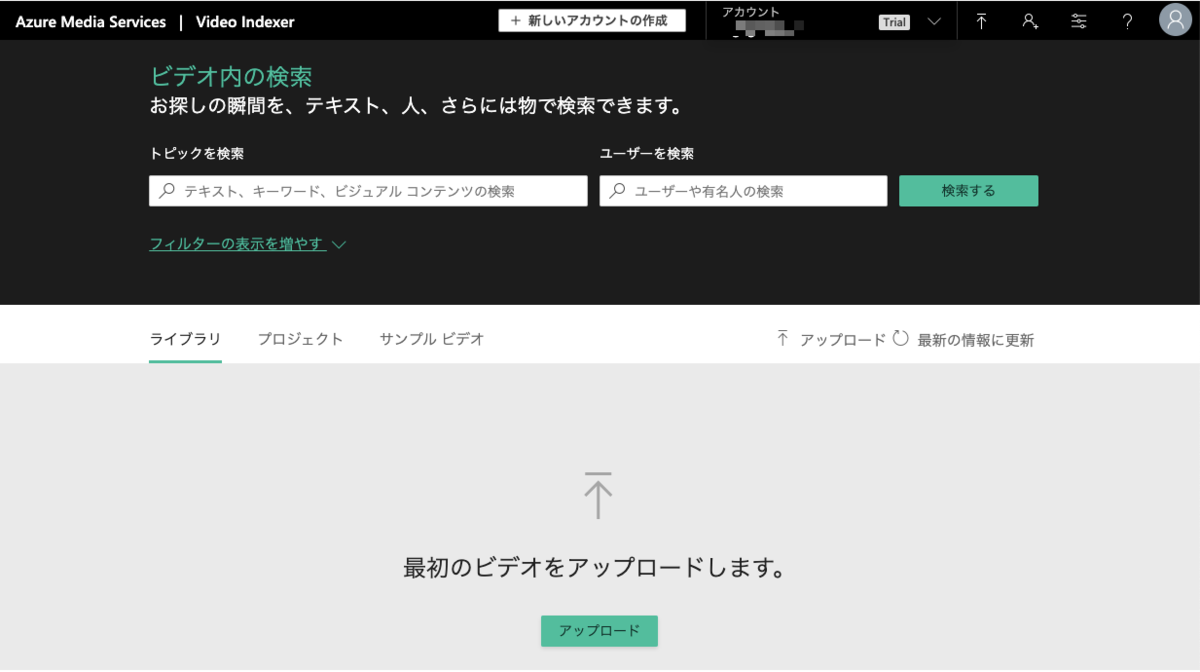
f:id:nari_kyu:20200301214217p:plain

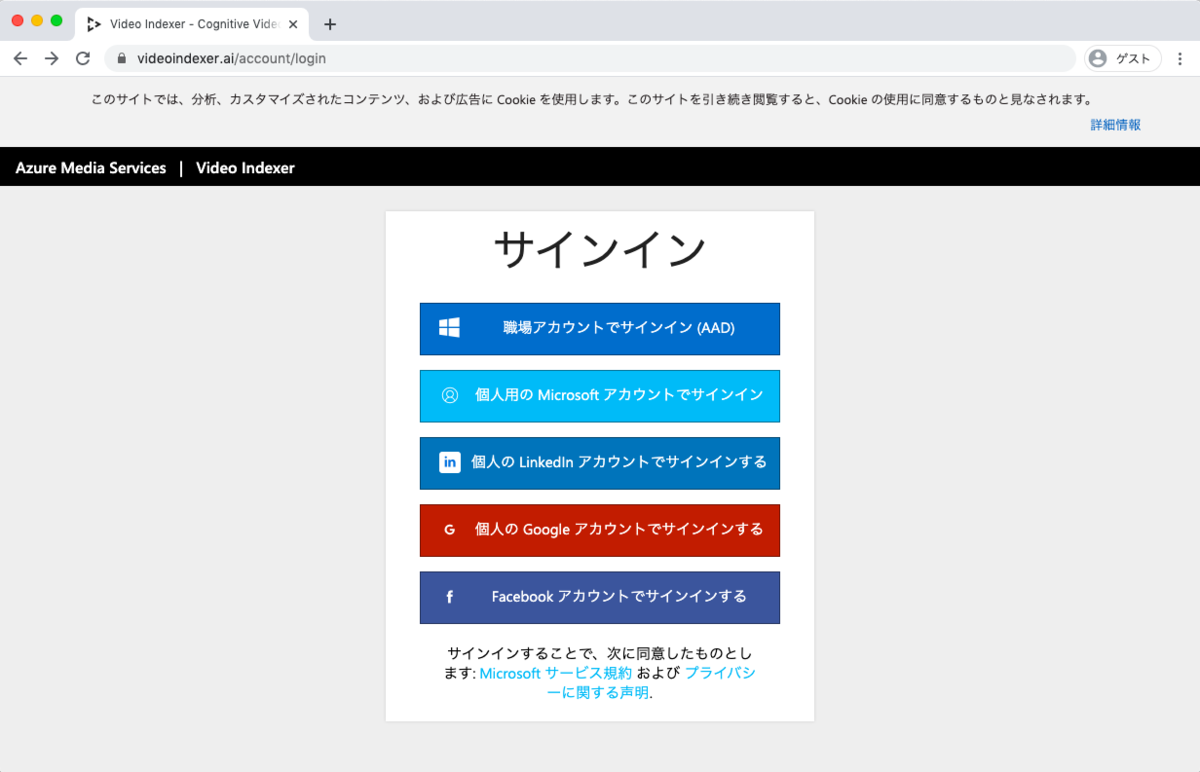
自分のアカウントでログイン

f:id:nari_kyu:20200301214328p:plain

f:id:nari_kyu:20200301214342p:plain

f:id:nari_kyu:20200301214354p:plain

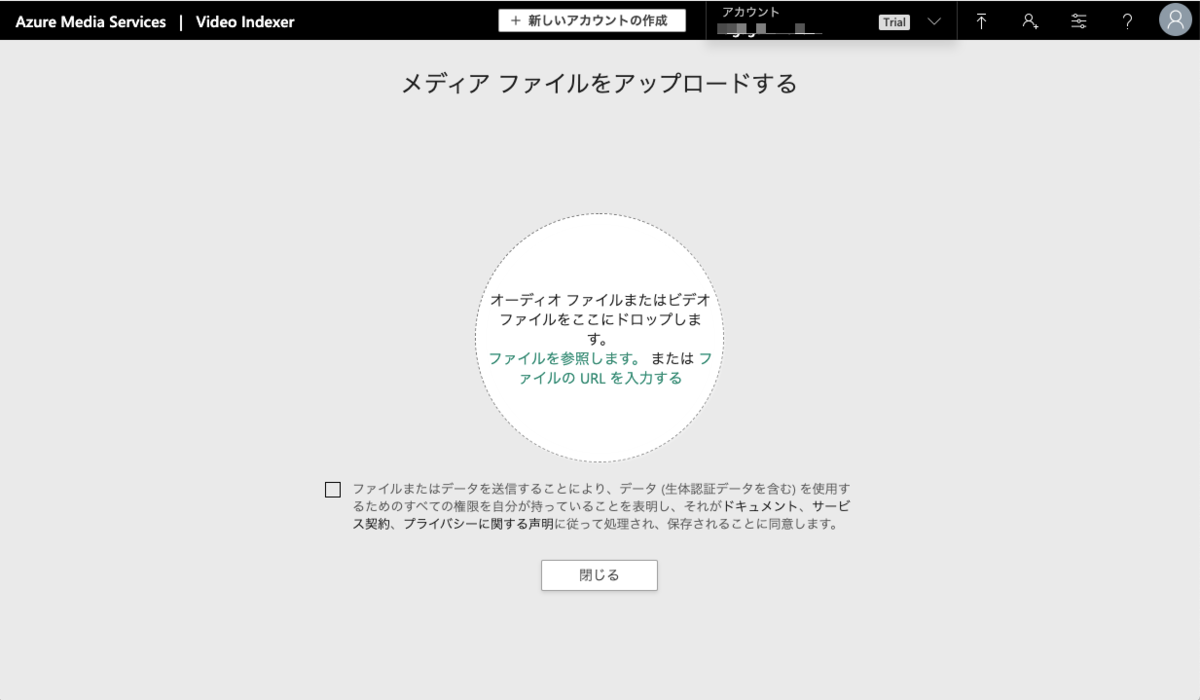
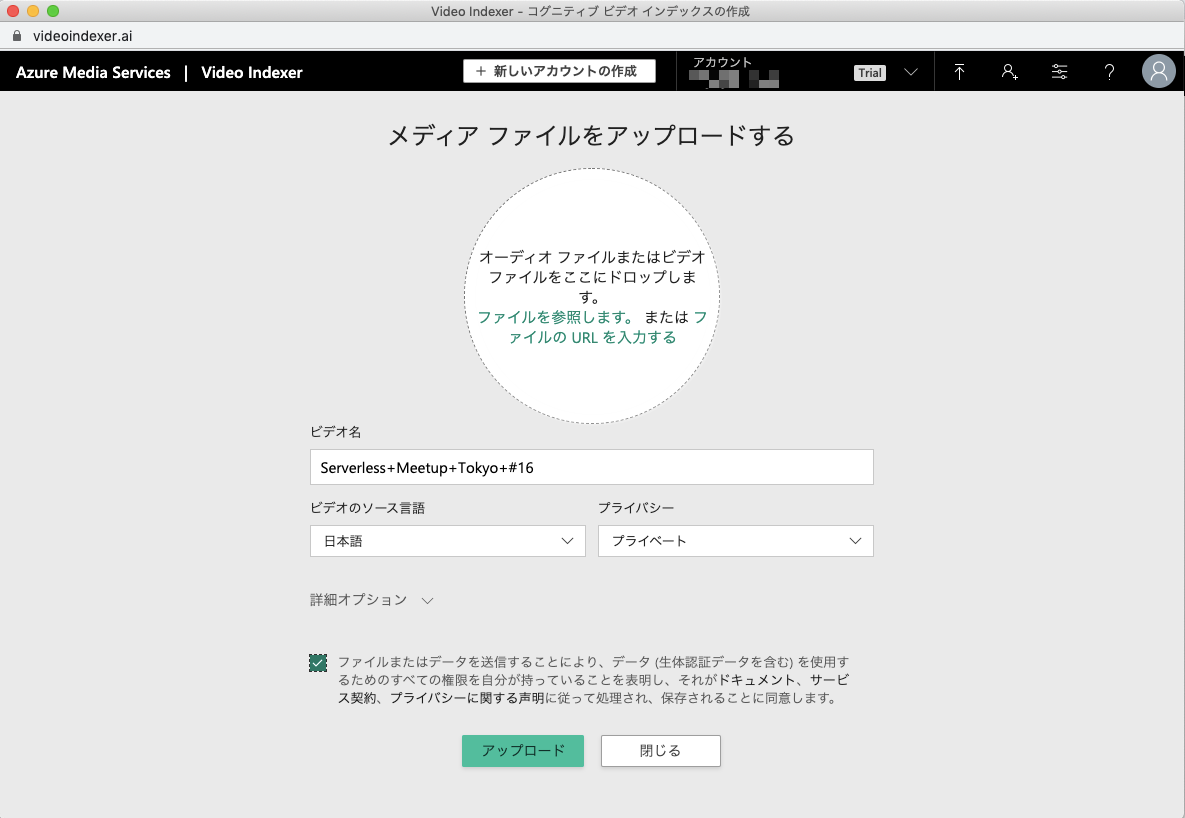
データのアップロード

アップロードに要する時間はご自身のネット環境に依存します。

今回の場合は 520MB の動画で 4 分ほどでアップロード出来ました。

f:id:nari_kyu:20200301214415p:plain

f:id:nari_kyu:20200301214432p:plain

そこから解析がスタートします。

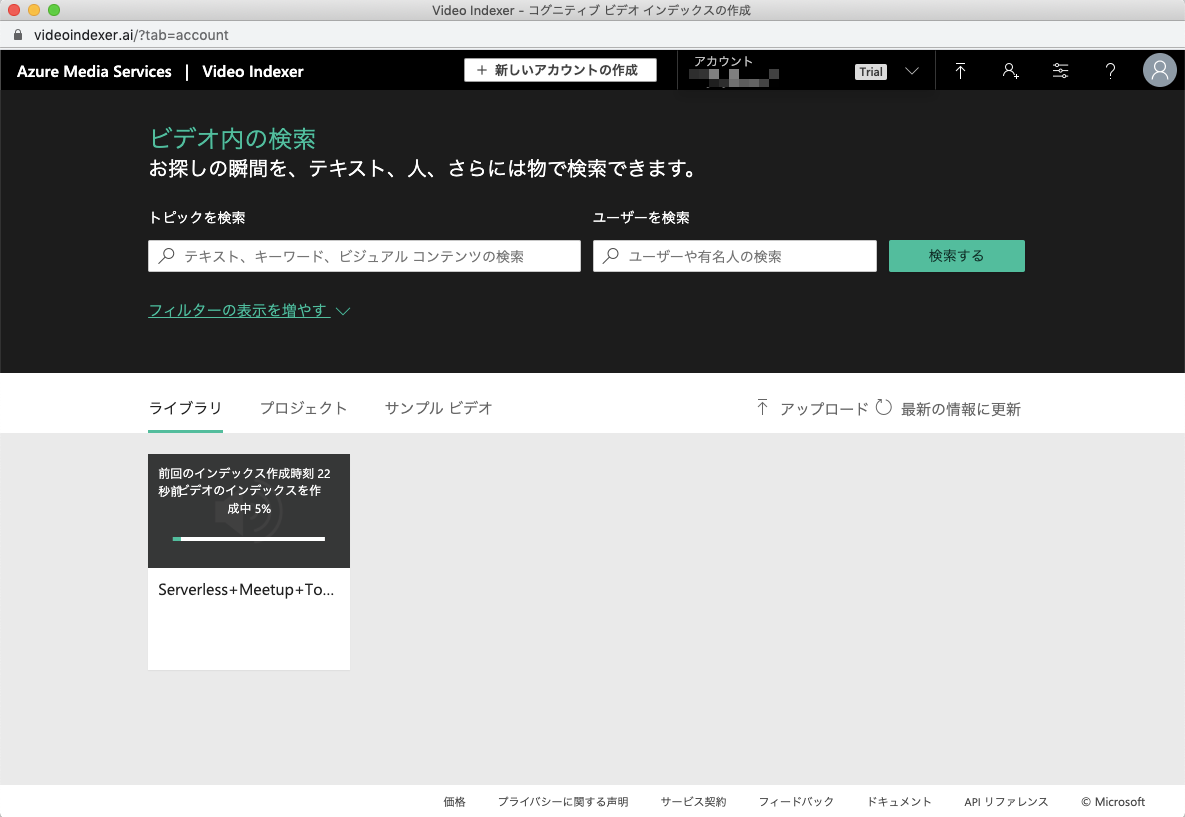
解析中は以下のようなシークバーが出るので、終るまで気長に待ちます。

f:id:nari_kyu:20200301214455p:plain

解析は動画と同じくらいの時間で出来ました。

ただ、これはたまたまだったかもしれません。

結果の確認

こんな感じ

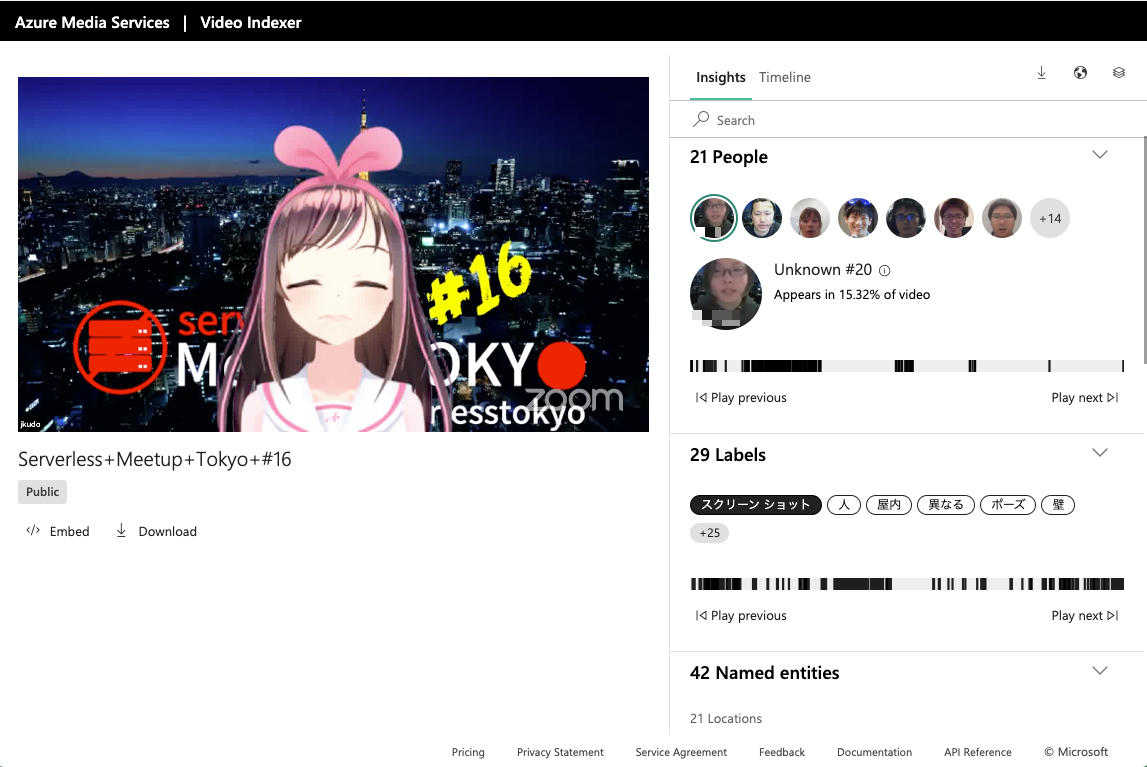
f:id:nari_kyu:20200301214535p:plain

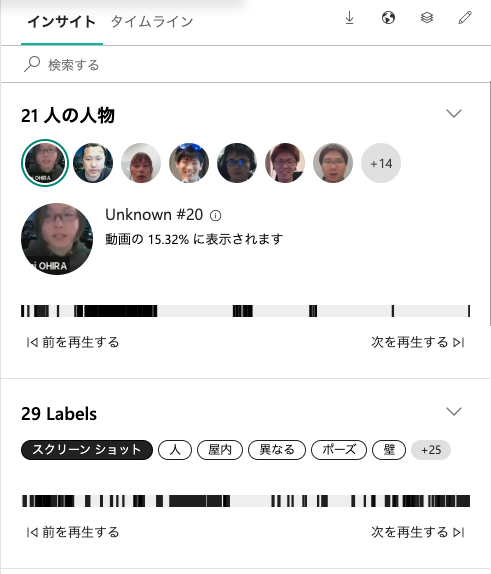
映像の解析を行った結果、動画内の人を認識し、かつその動画内でその人が映っている箇所を特定出来るようにされています。

f:id:nari_kyu:20200301214805p:plain

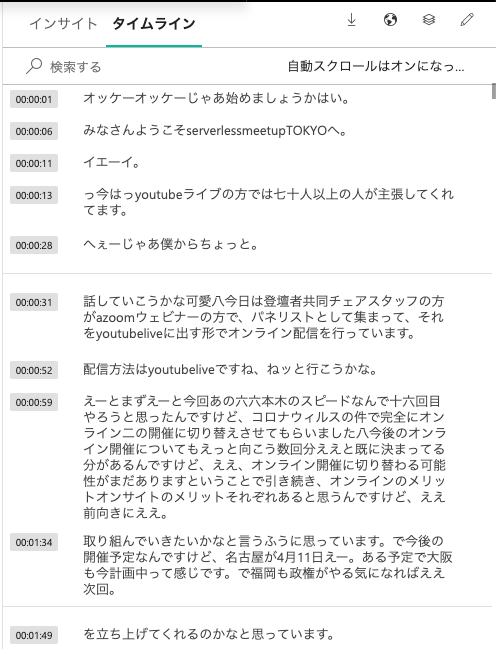
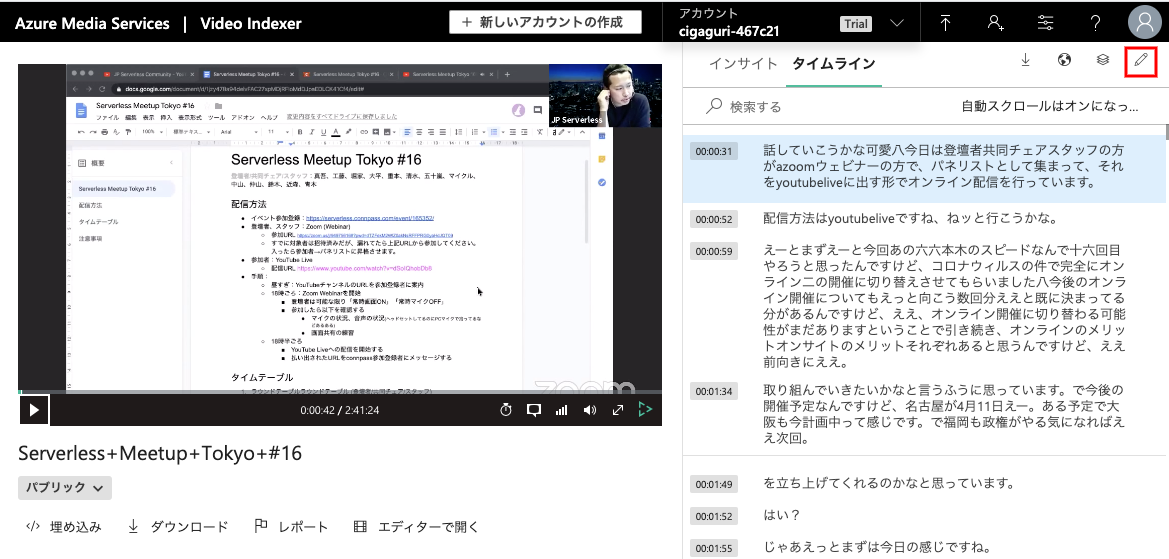
文字起こしもかなり精度良く出来ています。

f:id:nari_kyu:20200301214837p:plain

文字起こしが間違っている場合は右上の鉛筆マークから修正を行うことが可能です。

f:id:nari_kyu:20200301215107p:plain

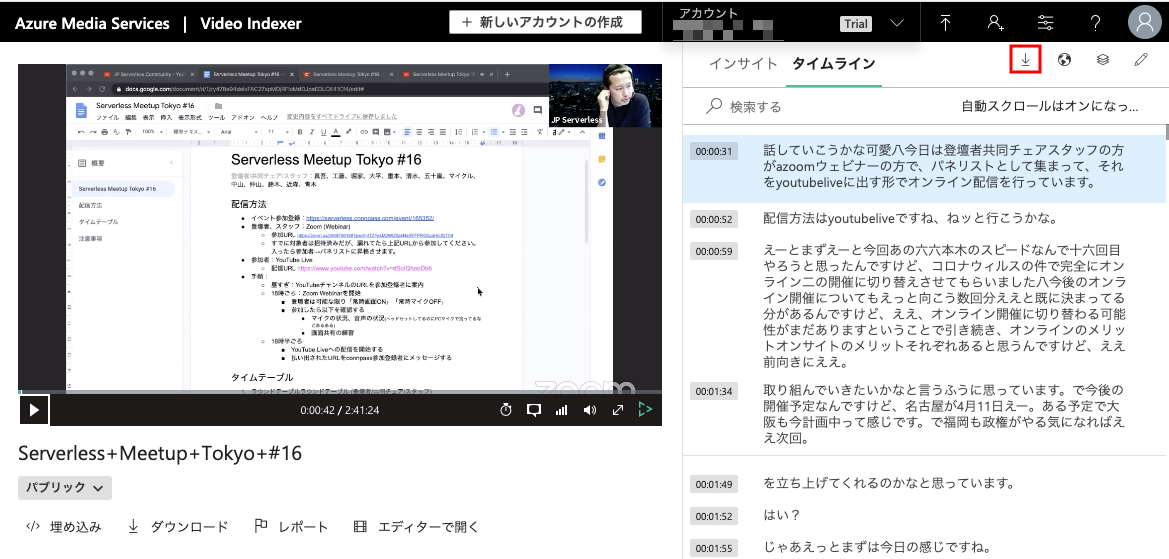
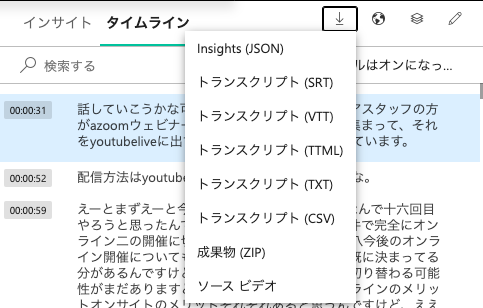
文字起こしのテキストも赤枠のところから、ダウンロードが可能です。

f:id:nari_kyu:20200301215200p:plain

f:id:nari_kyu:20200301215213p:plain

あとは、ローカルでさらに編集など行いましょう!!

まとめ

Video Indexer を使うことで、2 時間超えの映像も簡単に文字起こしが出来ました!!

本当に簡単にここまで出来ました!!

Azure すごい!!

この次はテキストを英語翻訳し、Azure Media Services を用いて映像に載せていくようにしてみます!! (`・ω・´)ゞ

spot node pool to an Azure Kubernetes Service を試したみた!! 🚀

AKS クラスターに新しい機能が追加されたようなので、試してみました!!

公式ドキュメント

Add a spot node pool to an Azure Kubernetes Service (AKS) cluster

情報元

結論

AKS に spot node pool が使えるようになり、これが AKS の運用においてコスト削減に繋がるとのことです。

spot node pool というのは、Spot VMs[1] を用いた virtual machine scale set (vmss) [2] であり、コスト削減というのはこの Spot VMs を使うからです。

⚠ 注意事項

  • 2020/02/29 の時点では今回取り上げる Spot VMs 等はプレビュー段階のため、GA時にはコマンドや実行状況などは変わる可能性があります。
  • プレビュー版故に SLA は無いので、開発環境であっても自己責任で使用して下さい。
  • SpotVM の制約として、vmss は single fault domain[3] のみで可能なため、HA 構成を設定することが出来ません[4]
  • Azure 側にて、リソースが必要になった場合は、SpotVM は優先的にリソースを奪われるようです。

実際に構築してみる

手順は 2 個です。

順番にやっていきましょう!! 🙌

サブスクリプションの作成とプレビュー機能の有効化

spotpoolpreview preview 機能を使えるようにする

f:id:nari_kyu:20200229230833p:plain

f:id:nari_kyu:20200229230846p:plain

  • 今回の検証用に作成し、iganar-aks-test-20200229 とリネームしたものを使っていきます。
az account list --output table
# az account list --output table
Name                        CloudName    SubscriptionId             State    IsDefault
--------------------------  -----------  -------------------------  -------  -----------
iganari-hogehoge            AzureCloud   zzzzzzzzzzzzzzzzzzzzzzzzz  Enabled  True
iganari-hugahuga            AzureCloud   yyyyyyyyyyyyyyyyyyyyyyyyy  Enabled  False
iganar-aks-test-20200229    AzureCloud   xxxxxxxxxxxxxxxxxxxxxxxxx  Enabled  False
  • Default にセットしていない場合は az account set コマンドを使います。
az account set --subscription ${SubscriptionId}
# az account list --output table
Name                        CloudName    SubscriptionId             State    IsDefault
--------------------------  -----------  -------------------------  -------  -----------
iganari-hogehoge            AzureCloud   zzzzzzzzzzzzzzzzzzzzzzzzz  Enabled  False
iganari-hugahuga            AzureCloud   yyyyyyyyyyyyyyyyyyyyyyyyy  Enabled  False
iganari-aks-test-20200229   AzureCloud   xxxxxxxxxxxxxxxxxxxxxxxxx  Enabled  True
  • spotpoolpreview preview を登録します。

今回の spot node pool を用いた AKS を構築するには、spotpoolpreview 機能を Subscription の中で有効にする必要があるので下記のコマンドを実行しましょう。

az feature register --namespace "Microsoft.ContainerService" --name "spotpoolpreview"
### ex

# az feature register --namespace "Microsoft.ContainerService" --name "spotpoolpreview"
Once the feature 'spotpoolpreview' is registered, invoking 'az provider register -n Microsoft.ContainerService' is required to get the change propagated
{
  "id": "/subscriptions/xxxxxxxxxxxxxxxxxxxxxxxxx/providers/Microsoft.Features/providers/Microsoft.ContainerService/features/spotpoolpreview",
  "name": "Microsoft.ContainerService/spotpoolpreview",
  "properties": {
    "state": "Registering"
  },
  "type": "Microsoft.Features/providers/features"
}
  • 有効化には数分かかりますので、実行中のステータスに関しては以下のコマンドで確認出来ます。
az feature list -o table --query "[?contains(name, 'Microsoft.ContainerService/spotpoolpreview')].{Name:name,State:properties.state}"
### ex

### 実行前は何も表示されない
# az feature list -o table --query "[?contains(name, 'Microsoft.ContainerService/spotpoolpreview')].{Name:name,State:properties.state}

### 実行直後
# az feature list -o table --query "[?contains(name, 'Microsoft.ContainerService/spotpoolpreview')].{Name:name,State:properties.state}"
Name                                        State
------------------------------------------  -----------
Microsoft.ContainerService/spotpoolpreview  Registering

### 有効化完了
# az feature list -o table --query "[?contains(name, 'Microsoft.ContainerService/spotpoolpreview')].{Name:name,State:p
roperties.state}"
Name                                        State
------------------------------------------  ----------
Microsoft.ContainerService/spotpoolpreview  Registered
  • 上記のコマンドの State が Registered になったら、下記のコマンドで登録情報を更新します。
    • az provider register コマンドを使用して、Microsoft.ContainerServiceリソースプロバイダーの登録を更新しています。
az provider register --namespace Microsoft.ContainerService

---> ここまでの作業で spotpoolpreview preview 機能を使えるようになりました!! 🚀

Install aks-preview CLI extension

spot node pool を用いた AKS クラスタCLI から作成する場合、aks-preview CLI extension の version 0.4.32 以降が必要になります。

az extension add コマンドを使用して、aks-preview Azure CLI extension をインストールし、az extension update コマンドを使用して更新を確認しましょう。

az extension add --name aks-preview
az extension update --name aks-preview

---> ここで AKS を作る準備が出来ました!! 🚀

Add a spot node pool to an AKS cluster

複数のノードプールが有効になっている AKS クラスタを作成する

まずはいつも通りの AKS クラスタを作成します。

  • リソースグループの作成をします。
az group create --name my-Resource-Group --location eastus
  • AKS クラスタの作成をします。
    • オプションや K8s のバージョンはあくまでデモ用です。
az aks create \
    --resource-group my-Resource-Group \
    --name iganariAKSCluster \
    --vm-set-type VirtualMachineScaleSets \
    --node-count 2 \
    --generate-ssh-keys \
    --kubernetes-version 1.15.7 \
    --load-balancer-sku standard
  • 比較のために node pool を追加しておきましょう。
az aks nodepool add \
    --resource-group my-Resource-Group \
    --cluster-name iganariAKSCluster \
    --name nodepoolno \
    --node-count 3 \
    --kubernetes-version 1.15.5 \
    --no-wait

spot node pool を追加します。

  • 下記のコマンドにて追加することが出来ます。
    • --priority Spot 及び、 --enable-cluster-autoscaler のオプションが付いていることが分かります。
az aks nodepool add \
    --resource-group my-Resource-Group \
    --cluster-name iganariAKSCluster \
    --name nodepoolspot \
    --priority Spot \
    --eviction-policy Delete \
    --spot-max-price -1 \
    --enable-cluster-autoscaler \
    --min-count 1 \
    --max-count 3 \
    --no-wait

AKS の状態を確認しましょう。

  • CLI にて確認していきましょう。
# az aks nodepool list --resource-group my-Resource-Group --cluster-name iganariAKSCluster -o table
The behavior of this command has been altered by the following extension: aks-preview
Name          OsType    VmSize           Count    MaxPods    ProvisioningState
------------  --------  ---------------  -------  ---------  -------------------
nodepool1     Linux     Standard_DS2_v2  2        110        Succeeded
nodepoolno    Linux     Standard_DS2_v2  3        110        Succeeded
nodepoolspot  Linux     Standard_DS2_v2  3        110        Succeeded
  • ポータルからも確認してみましょう。

f:id:nari_kyu:20200229231711p:plain

---> これで spot node pool を用いた AKS の構築自体は完了です!! 🚀

サンプルプログラムを配置してみる

実際に動くサンプルアプリケーションを用いて挙動を確認してみましょう。

サンプルアプリケーションは公式のものを使用します。

  • まずは AKS との認証を行います。
az aks get-credentials --resource-group my-Resource-Group --name iganariAKSCluster

Azure の公式ドキュメントに載っているサンプルの YAML をすこし改良してみます。

kind: Namespace
apiVersion: v1
metadata:
  name: sample-vote
  labels:
    name: sample-vote

---

apiVersion: apps/v1beta1
kind: Deployment
metadata:
  name: azure-vote-back
  namespace: sample-vote
spec:
  replicas: 1
  template:
    metadata:
      labels:
        app: azure-vote-back
    spec:
      nodeSelector:
        "beta.kubernetes.io/os": linux
      containers:
      - name: azure-vote-back
        image: redis
        ports:
        - containerPort: 6379
          name: redis
      tolerations:
      - key: "kubernetes.azure.com/scalesetpriority"
        operator: "Equal"
        value: "spot"
        effect: "NoSchedule"

---

apiVersion: v1
kind: Service
metadata:
  name: azure-vote-back
  namespace: sample-vote
spec:
  ports:
  - port: 6379
  selector:
    app: azure-vote-back

---

apiVersion: apps/v1beta1
kind: Deployment
metadata:
  name: azure-vote-front
  namespace: sample-vote
spec:
  replicas: 1
  strategy:
    rollingUpdate:
      maxSurge: 1
      maxUnavailable: 1
  minReadySeconds: 5 
  template:
    metadata:
      labels:
        app: azure-vote-front
    spec:
      nodeSelector:
        "beta.kubernetes.io/os": linux
      containers:
      - name: azure-vote-front
        image: microsoft/azure-vote-front:v1
        ports:
        - containerPort: 80
        resources:
          requests:
            cpu: 250m
          limits:
            cpu: 500m
        env:
        - name: REDIS
          value: "azure-vote-back"
      tolerations:
      - key: "kubernetes.azure.com/scalesetpriority"
        operator: "Equal"
        value: "spot"
        effect: "NoSchedule"
---

apiVersion: v1
kind: Service
metadata:
  name: azure-vote-front
  namespace: sample-vote
spec:
  type: LoadBalancer
  ports:
  - port: 80
  selector:
    app: azure-vote-front
  • kubectl コマンドを持ちいて、デプロイしましょう。
kubectl create -f sample.yaml
  • デプロイ後に Pod を確認してみましょう。
    • spot node pool 上に Pod が作成出来たのが確認出来ます。
kubectl get po --namespace=sample-vote -o wide
# kubectl get po --namespace=sample-vote -o wide
NAME                                READY   STATUS    RESTARTS   AGE     IP           NODE                                   NOMINATED NODE   READINESS GATES
azure-vote-back-79ccd5b979-qh4bw    1/1     Running   0          8m14s   10.244.7.2   aks-nodepoolspot-20405705-vmss000000   <none>           <none>
azure-vote-front-559d85d4f7-898wz   1/1     Running   0          105s    10.244.4.2   aks-nodepoolno-20405705-vmss000000     <none>           <none>
  • 外部 IP アドレスの確認をします。
# kubectl get service --namespace=sample-vote
NAME               TYPE           CLUSTER-IP     EXTERNAL-IP    PORT(S)        AGE
azure-vote-back    ClusterIP      10.0.236.31    <none>         6379/TCP       8m19s
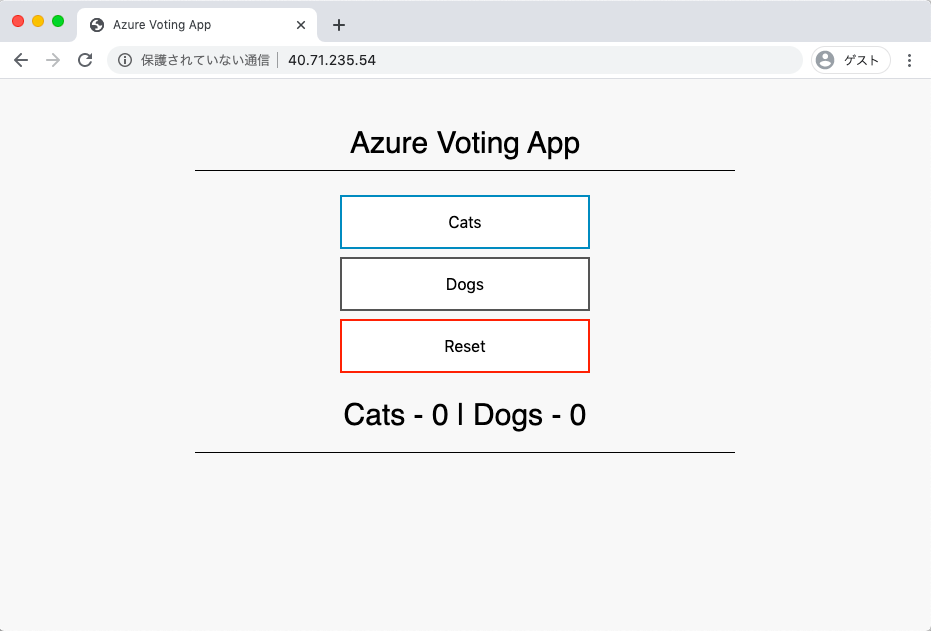
azure-vote-front   LoadBalancer   10.0.113.113   40.71.235.54   80:32604/TCP   8m17s
f:id:nari_kyu:20200229232827p:plain

---> ちゃんと起動して、かつ動くことを確認出来ました!! 🚀

削除コマンド

検証が完了した後にはリソースの解放をしておきましょう。

kubectl delete -f sample.yaml
for i in nodepoolno nodepoolspot ;
  do \
    az aks nodepool delete \
      --resource-group my-Resource-Group \
      --cluster-name iganariAKSCluster \
      --name $i ;
  done
az aks delete \
    --resource-group my-Resource-Group \
    --name iganariAKSCluster
az group delete \
    --name my-Resource-Group

---> これでリソースの解放も完了です!! 💪

まとめ

AKS の新しい機能である、spot node pool を使った AKS を構築し、その上に Pod を配置して、ブラウザでアプリケーションの動作確認を取るところまで確認出来ました。

ほぼ、CLI からの操作で簡単に行えるので操作感的には問題ないかと思います。

また、マニュフェストファイルへの追加事項も多くないので、一度書いてしまえばそこまで苦ではありません。

一点、疑問が残るのですが、Spot VMs を使っていること自体を確認するパラメータが今の所見つからないので、名前等で判別出来るようにしておかないといけないのか??と思っています 🤔

さすがにそれは無いと思いますが…

また spot node pool 及び、Spot VMs を使うに当たっていくつかの制約があるので、この機能を使う前に併せて読んでおいたほうが良さそうです。[5]

というとこで、今回の検証は終わりになります。

引き続き、AKS の進化を楽しんでいきましょう!!

Have fun !! :)

参考