動悸
Serverlessdays Tokyo 2019 にて素敵な登壇があり、実際に書いてみようと思いました。
- Azure でサーバーレス、 Infrastructure as Code どうしてますか? by @dz_
- Have fun! 💖
www.slideshare.net
Terraform は普段から書いているし、ちょうど Google Cloud Storage をいじっていたので、 同じストレージ系だからそこまで時間かけずにいけるだろうと思い、 Azure Storage の中の Azure Blob を調べるとこからはじめました。
調査と実際に簡単な検証、コードを公開出来るようにまとめるまでに 8 時間くらいかかりました。
Azure に慣れていないので、 Terraform において Azure にログインするとこで一回心が折れましたが、なんとかミニマムで公開出来るくらいにはまとまりました。
サンプルコード
以下の Repository が実際に作成したサンプルコードです。
実際にやってみる
Azure のアカウントの作成
ここは他に記事におまかせします。
Docker のインストール
実行環境を Dockerfile で用意しています。
したがって、作業マシンに Docker Engine をインストールしてください。
参考: Install Docker
Repository の取得
今回は自作した Repository を使って、挙動を確認していきます。
- Repository を clone します。
cd {YOUR_WORKSPACE}
git clone https://github.com/iganari/package-azure.git
- 今回のサンプルコードのディレクトリに移動します。
cd storage/terraform/
- 以下がディレクトリ構成です。
$ tree
.
├── Dockerfile
├── README.ja.md
├── README.md
├── docker-build-run.sh
├── images
│   └── irasutoya
│       ├── azarashi
│       │   ├── animal_chara_computer_azarashi.png
│       │   ├── animal_chara_smartphone_azarashi.png
│       │   └── animal_gomafu_azarashi_baby.png
│       ├── hiyoko
│       │   ├── animal_mark_hiyoko.png
│       │   ├── hiyoko.png
│       │   ├── hiyoko_baby.png
│       │   └── niwatori_hiyoko_koushin.png
│       └── penguin
│           ├── animal_chara_computer_penguin.png
│           ├── animal_chara_smartphone_penguin.png
│           ├── natsubate_penguin.png
│           └── ondanka_animal_penguin.png
├── provider.tf
├── resource_group.tf
├── storage.tf
├── terraform.tf
└── variables.tf

5 directories, 20 files
Terraform の設定ファイルの説明を簡単に示します。
- terraform.tf
- Terraform のバージョンを固定します。
- Terraform はバージョンが上がるのが早いので可能な限り、固定したほうがいいでしょう。
terraform {
  required_version = "0.12.12"
}
- resource_group.tf
- Azure の中のリソースグループを定義しています。
- https://www.terraform.io/docs/providers/azurerm/r/resource_group.html
resource "azurerm_resource_group" "arg_default" {
  name     = "${lookup(var.common, "rsg_name")}"
  location = "${lookup(var.common, "rsg_location")}"
}
- storage.tf
- 実際に Azure Storage のリソースを作成するところです。
- https://www.terraform.io/docs/providers/azurerm/r/storage_blob.html
resource "random_string" "asa-suffix" {
  length  = "8"
  upper   = false
  lower   = true
  number  = false
  special = false
}

resource "azurerm_storage_account" "asa_default" {
  name                     = "${lookup(var.storage, "asa_name")}${random_string.asa-suffix.id}"
  resource_group_name      = "${azurerm_resource_group.arg_default.name}"
  location                 = "${lookup(var.common, "rsg_location")}"
  account_tier             = "Standard"
  account_replication_type = "LRS"
}

resource "azurerm_storage_container" "asc_default" {
  name                  = "${lookup(var.storage, "asc_name")}"
  resource_group_name   = "${azurerm_resource_group.arg_default.name}"
  storage_account_name  = "${azurerm_storage_account.asa_default.name}"
  container_access_type = "private"
}

resource "azurerm_storage_blob" "asb_default_01" {
  name                   = "penguin_01.png"
  resource_group_name    = "${azurerm_resource_group.arg_default.name}"
  storage_account_name   = "${azurerm_storage_account.asa_default.name}"
  storage_container_name = "${azurerm_storage_container.asc_default.name}"
  type                   = "Block"
  source                 = "images/irasutoya/penguin/animal_chara_computer_penguin.png"
}
resource "azurerm_storage_blob" "asb_default_02" {
  name                   = "sample/penguin_02.png"
  resource_group_name    = "${azurerm_resource_group.arg_default.name}"
  storage_account_name   = "${azurerm_storage_account.asa_default.name}"
  storage_container_name = "${azurerm_storage_container.asc_default.name}"
  type                   = "Block"
  source                 = "images/irasutoya/penguin/animal_chara_smartphone_penguin.png"
}

resource "azurerm_storage_blob" "asb_default_03" {
  count = "${length(var.image-hiyoko)}"

  # same version
  name = "sample03/hiyoko/${element(var.image-hiyoko, count.index)}"
  # # rename version
  # name = "sample03/hiyoco-${lookup(var.image-hiyoko, count.index)}"

  resource_group_name    = "${azurerm_resource_group.arg_default.name}"
  storage_account_name   = "${azurerm_storage_account.asa_default.name}"
  storage_container_name = "${azurerm_storage_container.asc_default.name}"
  type                   = "Block"
  source                 = "images/irasutoya/hiyoko/${element(var.image-hiyoko, count.index)}"
}
- variables.tf
- 変数をまとめておく設定ファイルです。
variable "common" {
  type = "map"
  default = {
    rsg_name     = "rsg-sample"
    rsg_location = "West Europe"
  }
}

variable "storage" {
  type = "map"
  default = {
    asa_name = "asasample"  # name can only consist of lowercase letters and numbers, and must be between 3 and 24 characters long.
    asc_name = "asc-sample"  # Only lowercase alphanumeric characters and hyphens allowed.
  }
}

variable "image-hiyoko" {
  default = [
    "animal_mark_hiyoko.png",
    "hiyoko_baby.png",
    "hiyoko.png",
    "niwatori_hiyoko_koushin.png"
  ]
}
以上が Terraform の設定ファイルになります。
また、 Dockerfile を用いた環境を構築するために、以下のようのなシェルスクリプトも用意しました。
- docker-build-run.sh
#!/bin/bash

set -xeu

_I_TAG='pkg-azure-storage-tf'
BASEPATH=$(cd `dirname $0`; pwd)
DIREPATH=`echo $BASEPATH | awk -F\/ '{print $NF}'`

set +eu
docker rm -f ${_I_TAG}
set -eu

docker build . -t ${_I_TAG}

docker run --rm \
           -it \
           -v $BASEPATH:/opt/iganari/$DIREPATH \
           -w /opt/iganari/$DIREPATH \
           -h ${_I_TAG} \
           --name ${_I_TAG} \
           ${_I_TAG} \
           /bin/sh
上記のファイルを用意したら、実行していきます。
Docker コンテナを用いて、 Terraform を実行する
- Docker コンテナの起動をします。
- 以降、 🐳 がついているものはこの Docker コンテナ上で実行しているものとします。
sh docker-build-run.sh
- 🐳 az コマンドのバージョンの確認します。
- 執筆当時は 2 系を使用していますが、読むタイミングによってはバージョンがもっと進んでいる可能性があります。
# az --version
azure-cli (2.0.57)
- 🐳 Terraform のバージョンを確認します。
- 執筆当時は 0.12.12 系を使用していますが、読むタイミングによってはバージョンがもっと進んでいる可能性があります。
- しかし、今回の環境においては terraform.tf で Terraform のバージョンを指定しているため、このバージョンでしか実行出来ないようになっています。
- Dockerfile にもこのバージョンを指定してインストールしているため、このバージョンが使用出来ない場合はそもそも Docker コンテナが起動しない可能性があります。
# terraform --version
Terraform v0.12.12
- 🐳 az コマンドを持ちいて、 Azure にログインします。
- https://microsoft.com/devicelogin での認証になるので、ブラウザで認証を進めましょう。
az login
### 例

# az login
To sign in, use a web browser to open the page https://microsoft.com/devicelogin and enter the code {ここに認証用のコードが出力されています} to
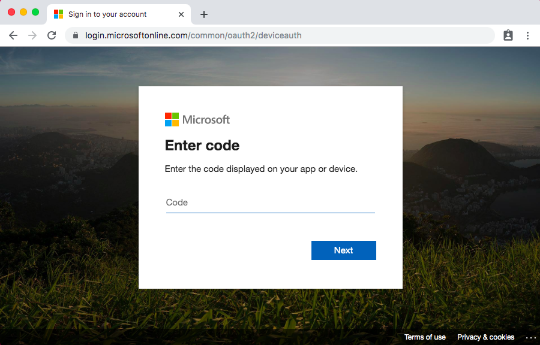
### ブラウザでの認証が完了する以下のように、現在使用出来るサブスクリプションが表示されます。

authenticate.
[
  {
    "cloudName": "AzureCloud",
    "id": "xxxxxxxxxxxxxxxxxxxxx",
    "isDefault": false,
    "name": "xxxxxxxxxxxxxxxxxxxxx",
    "state": "Warned",
    "tenantId": "xxxxxxxxxxxxxxxxxxxxx",
    "user": {
      "name": "xxxxxxxxxxxxxxxxxxxxx",
      "type": "user"
    }
  },
  {
    "cloudName": "AzureCloud",
    "id": "xxxxxxxxxxxxxxxxxxxxx",
    "isDefault": true,
    "name": "xxxxxxxxxxxxxxxxxxxxx",
    "state": "Enabled",
    "tenantId": "xxxxxxxxxxxxxxxxxxxxx",
    "user": {
      "name": "xxxxxxxxxxxxxxxxxxxxx",
      "type": "user"
    }
  },
.
.
.
以下、割愛
- 🐳 現在のデフォルトのサブスクリプションを確認します。
- 環境によっては、複数出てくるかもしれませんが、重要なのは IsDefault のカラムが Trure になっているものです。
az account
OR
az account list -o table
### 例

# az account list -o table
A few accounts are skipped as they don't have 'Enabled' state. Use '--all' to display them.
Name                        CloudName    SubscriptionId                        State    IsDefault
--------------------------  -----------  ------------------------------------  -------  -----------
iganari-dev                 AzureCloud   xxxxxxxxxxxxxxxxxxxxxxxxxxxxxxxxxxxx  Enabled  True
- 🐳 デフォルトのサブスクリプションを変更したい場合は以下のコマンドを実行します。
_s_id='{上記でSubscriptionIdの項のもの}'
az account set --subscription ${_s_id}
### 確認のため
az account list -o table
- 🐳 Terraform の初期設定を行います。
terraform init
### 例

# terraform init

Initializing the backend...

Initializing provider plugins...
- Checking for available provider plugins...
- Downloading plugin for provider "random" (hashicorp/random) 2.2.1...
- Downloading plugin for provider "azurerm" (hashicorp/azurerm) 1.35.0...

The following providers do not have any version constraints in configuration,
so the latest version was installed.

To prevent automatic upgrades to new major versions that may contain breaking
changes, it is recommended to add version = "..." constraints to the
corresponding provider blocks in configuration, with the constraint strings
suggested below.

* provider.azurerm: version = "~> 1.35"
* provider.random: version = "~> 2.2"

Terraform has been successfully initialized!

You may now begin working with Terraform. Try running "terraform plan" to see
any changes that are required for your infrastructure. All Terraform commands
should now work.

If you ever set or change modules or backend configuration for Terraform,
rerun this command to reinitialize your working directory. If you forget, other
commands will detect it and remind you to do so if necessary.
- 🐳 Terraform にてテストを実行します。
- 新規作成の場合は特に問題は出ないかと思いますが、もし問題があれば修正しましょう。
terraform plan
# terraform plan
Refreshing Terraform state in-memory prior to plan...
The refreshed state will be used to calculate this plan, but will not be
persisted to local or remote state storage.


------------------------------------------------------------------------

An execution plan has been generated and is shown below.
Resource actions are indicated with the following symbols:
  + create

Terraform will perform the following actions:

  # azurerm_resource_group.arg_default will be created
  + resource "azurerm_resource_group" "arg_default" {
      + id       = (known after apply)
      + location = "westeurope"
      + name     = "rsg-sample"
      + tags     = (known after apply)
    }
.
.
.
割愛
.
.
.

------------------------------------------------------------------------

Note: You didn't specify an "-out" parameter to save this plan, so Terraform
can't guarantee that exactly these actions will be performed if
"terraform apply" is subsequently run.
- 🐳 テストが無事に通ったら、実際にリソースを作るコマンドを実行します。
terraform apply
### 例
# terraform apply

An execution plan has been generated and is shown below.
Resource actions are indicated with the following symbols:
  + create

Terraform will perform the following actions:

  # azurerm_resource_group.arg_default will be created
  + resource "azurerm_resource_group" "arg_default" {
      + id       = (known after apply)
      + location = "westeurope"
      + name     = "rsg-sample"
      + tags     = (known after apply)
    }

.
.
.
割愛
.
.
.


Do you want to perform these actions?
  Terraform will perform the actions described above.
  Only 'yes' will be accepted to approve.

  Enter a value:

********************************************
*** 上記のように、確認を求めらるので、 yes とします。
*** 下記が yes と入力した後の出力です。
********************************************

Do you want to perform these actions?
  Terraform will perform the actions described above.
  Only 'yes' will be accepted to approve.

  Enter a value: yes

random_string.asa-suffix: Creating...
random_string.asa-suffix: Creation complete after 0s [id=sxvygxvo]

.
.
.
割愛
.
.
.

azurerm_storage_blob.asb_default_03[0]: Creation complete after 8s [id=https://asasamplesxvygxvo.blob.core.windows.net/asc-sample/sample03/hiyoko/animal_mark_hiyoko.png]

Apply complete! Resources: 10 added, 0 changed, 0 destroyed.

**********************************************************
*** 上記のように出たら、実行完了なので、ブラウザで確認してみましょう。
**********************************************************
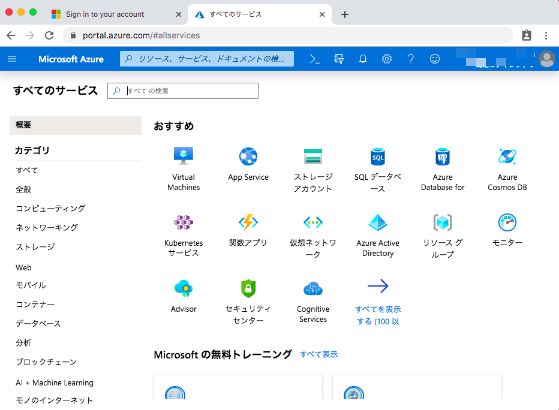
ブラウザでリソースを確認します。
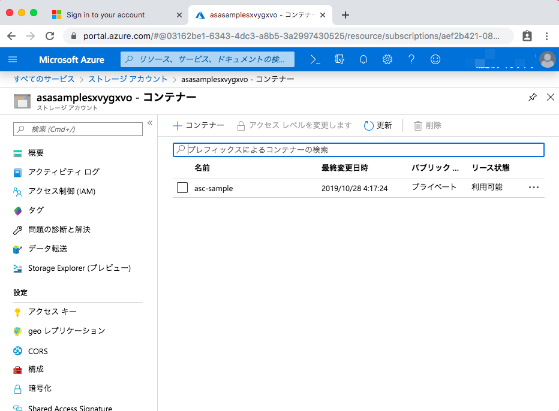
- ストレージ アカウント にて
asasampleから始まるリソースをクリックします。asasampleより後ろは乱数を生成しています。
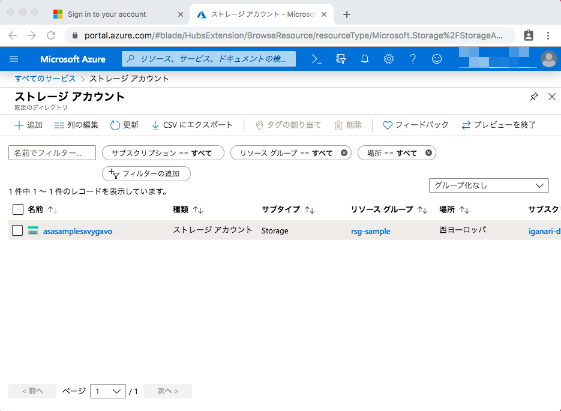
- コンテナーをクリックし、
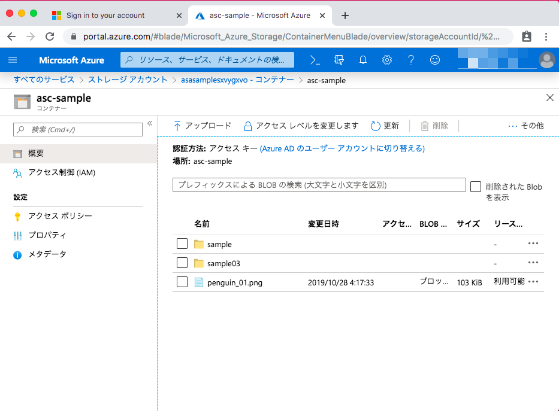
asc-sampleをクリックします。
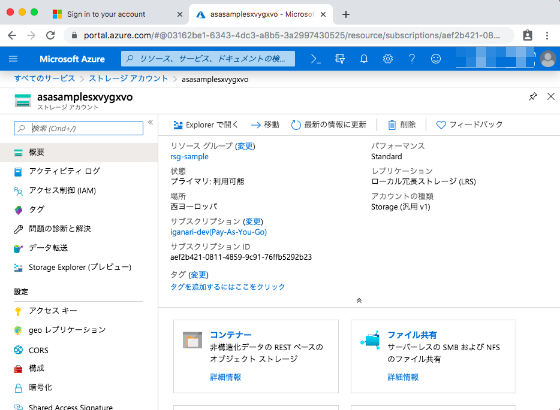
- 試しに penguin_01.png をクッリクし、ダウンロードをしてみます。
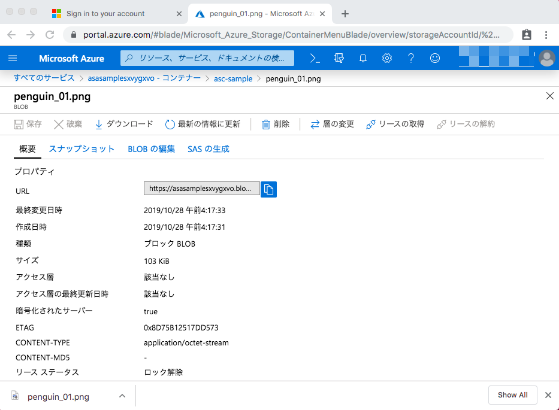
- 問題無くダウンロード出来れば、いらすとやさんからお借りしたペンギンの画像がダウンロードされます。
- せっかくなので、他の画像もダウンロードしてみてくださいね!

リソースの削除
検証が終わったら、 Azure のリソースは削除しましょう。
- Azure Storage はアカウント作成後 12ヶ月を過ぎると無料枠が無くなり、通常の課金が発生します。
🐳 Terraform にてリソース削除をします。
terraform destroy
まとめとか感想とか
Terraform を通じて、 Azure のリソースの IaC(Infrastructure as Code) をすこしだけ触れられたかと思います。
難しく無いと言えば難しくないのですが、慣れないとかなり手こずる箇所もあるかと思いますので、サンプルを作ってみましたが如何でしたでしょうか??
動かなかったり、脆弱性があった場合はぜひ Issues にて教えて頂けると幸いです(-人-) ---> issues
ソースには細かい Tips も結構いれてあるのですが、細部まで説明出来なかったので、また他の記事で書きたいと思います。
Have fun! 💖


